Showing posts with label winter. Show all posts

Tuesday, May 8, 2018

Hello Spring. Nice of You to Show Up...FINALLY

After a winter that seemed that it would never end, the sun is finally out and shining, and the course is coming back into shape, albeit about a month later than we are used to.  The extended cold temperatures and excessive rainfall that we experienced in the months of March and April delayed the green up of the bermudagrass and have caused the delay in some of our maintenance practices that we would normally have performed by now.


The delay in the normal springtime temperatures has caused delays in the green up of a few areas on the course and we have been asked about these, why they occurred, what we could do about them, and how long will they be this way.  Dr. Jim Brosnan, Associate Professor University of Tennessee, recently wrote an article about the delayed greenup that we are experiencing in the transition zone and I thought I would pass along his excellent explanation.


To be honest a few weeks ago, as I examined the golf course, I was fearful we would have to sod several areas on the course.  Since the weather has taken a turn for the better in the past week, with full days of warm sun and little to no rain, the turfgrass has also taken a turn, and one for the better.  We are seeing substantial growth and recovery in these areas and will be doing a few cultural practices over the next few weeks to help the turf along.  The first practice, which started this morning will be to vertical mow the weak areas to remove any crusting of thatch and algae and expose the underlying turfgrass to the warmth and benefit of the sun.

The next practice will be to use our Aerway shattertine slicer to solid tine aerify the weak areas to allow a void for any water that falls or is applied to be removed from the surface as to not drown the new plants as they grow or allow any algae to reform and to allow oxygen into the soil to promote root growth and recovery.  We will follow the solid tine venting with mowing of the fairways to smooth out the surface.  Following this we will apply some extra fertility to these areas to give them a little boost.

Your agronomy staff has worked very hard over the years to provide the high quality conditions that you have come to expect.  We understand questions arise when things look out of place and we will do everything we can to answer those questions and concerns. The golf course is quickly coming back to form, now that Spring has finally decided to show up, and we are confident these weak areas will be filled in shortly.  As always if you have any questions, concerns, or comments about the course or any practices we perform on the course please don't hesitate to let us know.  We will do our best to answer them.

Saturday, February 18, 2017

Limbing Up Trees and Dressing Up the Walkpaths

We are fortunate at Harrison Bay to have an active group of golfers who love to walk our golf course.  These golfers make up a significant part of our yearly membership and our yearly rounds.  Through the years as we have increased our native grass acreage to eliminate daily maintenance expenses and increase the nesting and movement areas on the course for the wildlife we have unintentionally constricted the travel path for some of our walkers.  This winter we decided to dress up the walkways through the native grass areas to make it easier to travel and more attractive.

This winter has been about some of the smaller projects we can do to the course to improve it and one of those easy but very beneficial projects is to limb up the trees in the playing areas of the course.  Limbing up trees will provide better shot options for golfers, will allow more sunlight to reach the turfgrass so it can be healthier, and will give the golf course a better appearance overall.

To make the limbing up process easier we created a secure platform which we placed on the front end loader tractor which allowed us to reach farther up the tree to do a better job.  Trying to hold up an extended pole saw will tire the operator out quickly so this technique makes it safer and more productive.  With safety in mind the saw operator is secured to the tractor with a safety harness so he can not fall out.  This process has really sped up the limbing project and we are through the front nine in only a couple of weeks.

The big question was what do we do with all the limbs that we will generate and how do we use them to benefit the course.  We decided that we wanted to chip up the limbs and use them as mulch on the walk paths as I have seen done at some other golf courses.  Willie did some research and found this great little chipper WoodMaxx DC-1260 chipper.  It will easily chip up a limb up to 4" and is very economically priced compared to some of the chippers we were looking at to rent.  Now we have a chipper to help clean up the course when needed.

A simple plywood box was built on the back of one of our Toro Workman MDEs and we chip the limbs directly into the box.  Being small in size like the DC-1260 is makes it very easy to maneuver around and easy to use.  Once the box is full we take the chips to a nearby walkway and spread them across the path.

Using the wood chips on the walk ways will hopefully make the native grass areas more attractive and will give our walking golfers a nicer path to walk.  In the past following rainstorms some of the areas along the walking paths have had standing water or have been extremely muddy which is less than desirable to walk through or pull your pull cart through.  We hope this will eliminate these issues.

The wood chips through the native areas are a nice addition to our golf course and will help our walking guests have a better round.  That being said these areas are for WALKERS ONLY. NO golf carts should ever be taken into native grass areas or driven down the wood chip walk paths.  Please allow me to repeat this.  THE WOOD CHIP PATHS ARE FOR WALKERS ONLY.  GOLF CARTS ARE NOT ALLOWED TO USE THEM!!!!  Please help the course by doing your part and obeying the cart rules that are in place at Harrison Bay or at your own course if you can't come join us.

Friday, January 15, 2016

Covering Greens---What It Looks Like and Why We Do It

I really wish it only took this long to cover a green but in reality when you have a great crew, who know what they are doing, it can be that easy.  Covering greens is not an easy process but to help ensure the survival of ultradwarf greens in the transition zone it is a necessary evil.  No one likes to close a golf course to play but then again no one likes greens that are damaged in the summer from winter laziness or poor decisions.


Here is a link from a previous blogpost including a webcast from the United States Golf Association which better explains covering greens.


So much like you or I need a coat on when it gets cold outside, our greens do also, especially this year with the warm weather and the extended growth of the grass.  Covering the greens will increase the temperatures under the covers from 5-8 degrees higher than the temperature outside of the cover.  This may not sound like much but that slight increase in temperature can be the life and death of ultradwarf greens.  It takes a little work to protect them but it is worth every second in the long run.  And it is still better than syringing bentgrass greens all summer long.


Wednesday, April 29, 2015

Sunlight, Growth, and Patience...My Three Requests


With over 20 inches of rainfall in 2015 so far and close to 10 inches of that coming in April alone, the golf course is greening up at a slower pace than normal.  Areas which have been completely saturated over the winter months with little to no sunlight to dry them out are coated in a combined layer of algae and thatch/clippings which have floated up in all the rain.  As you can see in the picture to the right where there are breaks or cracks in the algae as it dries, there is green grass under there we just have to work to get it to the sun.

We have been fortunate this week that the algae/thatch layer has begun to dry out in sections.  In an effort to remove the material from the fairways we began vertical mowing these areas to bust up the layer and then used our turbine blowers to blow it into the roughs.  The vertical mowers, or verticutters as they are called, have blades which are positioned vertically and cut or slice into the surface, lifting and breaking up this layer.

Hopefully the sun will continue to shine and the soil temps will climb which should generate the growth in the turfgrass that we all want to see.  We will have some areas which will have to be sodded or seeded so we will have to ask for your patience as we work through these areas.  Patience is the key word here, both on the part of the golfer and for us as well, as we want to provide our guests with the best possible playing conditions just like they want to play on the best possible playing surfaces.

One practice we will be doing over the next few weeks will be to solid tine the tee boxes and the approaches.  This cultural practice will help to allow water to penetrate into the soil and will also allow for sunlight and air to reach the soil surface and the root system.  Just like aerification of the greens this is a vital process in the success of our golf course.

The tines we will be using for this process will be 3/4" solid tines which will be set to penetrate around 2.5" into the soil.  Following the venting process these areas will be mowed or rolled and should not affect your ball roll or play in any way but will pay off in dividends as the grass starts to grow.

We have also begun the process of leveling the irrigation lines around the holes which were renovated this winter.  Adding sand to the trench lines will help smooth out the area and will eliminate any disruption to your ball roll.  It will take a few topdressings to completely eliminate any evidence of the trench lines but they will be gone before you know it.

As I stated before, please be patient as we work to repair the golf course from the damage caused by the four wettest months I can remember in my career.  By the end of the summer this will all seem like a bad dream.

Friday, January 9, 2015

USGA Webcast on Covering Bermudagrass Putting Greens

With the recent cold weather and our greens currently being covered I thought it would be nice to share this webcast by Mr. Patrick O'brien, USGA Agronomist for the Southeast Region.  This short 10 minute webcast answers many of the questions many golfers have about using turf covers for bermudagrass putting greens.

Please use this link to view


Tuesday, November 18, 2014

Why Do We Cover The Greens?

On Monday the Agronomy Staff spent several hours pulling the covers on the greens.  Some of you may wonder why we cover the greens at certain times so I wanted to try and explain why. Our ultradwarf greens are most susceptible to injury during the winter months because they do not go completely dormant and yet are not actively growing either.  They still have live green tissue in the leaf and crown area which can be killed or damaged by winter desiccation or sudden cold temperatures.  Much like you need a coat on to go outside right now, our greens need a little extra protection to survive the cold nights.

Here is an example of how the covers help to protect and insulate the greens.  The air temperature at 7:35 this morning was 25 degrees with a wind chill of 16 degrees.  The measurement on the top is of an area which was covered all night. Our soil thermometer gave us a reading of 38.8 degrees while the bottom picture shows an area that was uncovered which had a soil temperature of 30.1 degrees.  Simple explanation for using covers is this, turfgrass plants have water inside of them inside of the plant cells. If this water is allowed to freeze it will, and often does, act like a balloon when frozen, it will burst.  Turfgrass cells which are damaged or burst/killed in the winter months will not revive themselves and the damaged areas on the greens will not green up in the spring.


Having the golf course closed for a few days while the covers are deployed is a minor inconvenience compared to the alternative which could like this green pictured here.  We will only pull the covers when I feel it is necessary to protect the golf course, not just to keep you off the course.  Trust me, pulling covers is not a fun task in the first place.

Monday, October 20, 2014

2014 Mowing Season is Done

As another mowing season comes to a close at Harrison Bay we have to look back to what all has been accomplished this year and look forward to the enhancements and improvements scheduled for the winter months ahead.  Your agronomy staff has been working hard this year to bring you the best playing conditions possible so if you see them out on the course, let them know you appreciate your efforts.

Last winter brought us some unexpected and unneeded very cold temperatures and snow cover.  Extended cold temperatures and shade are not the best friend to 419 bermudagrass which we have on our fairways and roughs.  As a result we had close to 3 acres of turf which had to be replaced or resodded. These areas have come in nicely and are ready for this winter to come.  If you have noticed we learned from last winter and have raised our height of cut on the fairways a bit more than normal and have moved some of the fairway cuts in on a couple of holes.

One of the biggest improvements we made to the course over the past year was the installation of new irrigation heads around many of the greens.  These heads have allowed us to only water the greens surface instead of using full circle technology which watered the green and the surrounds.  This has cut our watering time and has reduced the amount of water we use to water our greens by over 1 million gallons of water this year alone.  We have 6 more holes to go and this project will be in the books.  I bet Willie and Jonathan will be happy about that.


One change we made to the course this year (some liked it and some did not) was to change the way we mow the fairways and tees.  Instead of striping the fairways which we have done for several years we decided to mow the fairways and tees in the "classic cut" manor which means we mow up and back on one side of the area.  This was a drastic change but the final result was exactly what we wanted.  Not only did it give us a different and unique look, it saved us a considerable amount of time and fuel.  This season, by making this one simple change, we eliminated over 312 man hours spent on mowing fairways.  This reduction in mowing saved over 811 gallons of diesel fuel and eliminated the creation of over 18,000 pounds of carbon emissions.

In an effort to correct the many years of neglect and soft handedness we have given to our greens, this summer we got really aggressive with our aerification and verticutting of the greens.  There was a great deal of debate and concern over the process but in the end it turned out to be one of the best things we have done for our greens in quite a long time and as many of you have been telling us, they are the best they have been in many years.  Sometimes you have to break several eggs to make a really good omelet.

To repair some of the areas on the greens which were damaged from the winter we had to use our nursery, which is what it was made for.  After we used what we needed we went back and sprigged it and grew it in.  It was a good bit of work but having a source of sod on site and having the area double as a short game practice area is the perfect solution.

This year in an effort to help the pollinator population on the golf course we created two areas designated to the growing and cultivation of native wildflowers.  Working with Syngenta through their Operation Pollinator project we selected two areas, one beside #1 tee complex and one between #10 green and #11 tee complex, to create these areas.  The project has been a great success and we see these areas teaming with bees and butterflies.  We will continue to improve our planting processes over the winter to hopefully have these areas even more plentiful with wildflowers and pollinators.

As we look ahead to next season we have many improvements in mind.  We will be adding the DryJect process to our aerification in August. We hope using this process will provide better subsurface drainage and root growth and will reduce the disruption to the putting surface so we can get the greens back to their desired quality sooner.  This winter we will finish our greens irrigation renovation, add surface drainage to #10 fairway, selectively reduce shade around the course, renovate the native planting bed between #1 tee and the driving range, and renovate the remaining fairway bunkers.

It is going to be a long winter and a lot of hard work.  We will do our best to not interfere with your round but please remember that all the work we are doing is simply to make your course better.


Wednesday, January 29, 2014

Winter Wonderland 2014

Like most of the south we got hit by a bitter arctic blast and got close to two inches of snow on Tuesday afternoon.  To say the roads were treacherous would be an understatement and it was very difficult for many people to get home.  Our friends in the more southern states who are not properly equipped for this weather are really feeling the brunt of this storm.  But all in all it was nice to see some snow since we have had all these cold temps anyway.


Here are some shots that I took from around the course this morning.

#10 green with the Harrison Bay Eagle Cam nest tree in the background

Looking across #14 green out into the Bay which was frozen for about 100 yds out

Glamour shot of our tee markers with the native area on #15 in the background

I love the way the broomsedge contrasts against the white snow.

I hope none of our Mallard Duck friends decide to land on the pond anytime soon because it is frozen although it looks like it is thawed in some areas.

The snow has been beautiful but I am ready to mow some green grass. 


Thursday, December 5, 2013

Preparing the putting greens for winter

Lots of things go into preparing our Champion ultradwarf greens for their long winter nap.  We begin preparing the greens early in the fall with fungicide applications to protect against Spring Dead Spot, increasing the mowing height of cut to allow the greens to put on a "winter coat", and changing our fertility program to increase root growth and food storage.  All of these practices, and more, go into giving our greens the best chance of rebounding out of dormancy in the spring.

One of the challenges that we have had over the years in the spring is the abundance of "old cups" that are left from the changing of hole locations during the winter months.  This is a picture taken in March of this year on hole #3.  The front of this green is narrow and limits the number of hole locations we have, thus the hole locations have all been in the same vicinity.  This multitude of old plugs will take over a month to blend in as the green begins to grow.


This past February at the Golf Industry Show in San Diego I attended a seminar talking about winter maintenance practices on ultradwarf bermudagrass greens.  Along with the normal information about fungicides and fertility and protective covers, the instructors introduced us to a program used at Pinehurst in which they placed several hole locations in the green at the beginning of the winter season and simply moved the flag from cup to cup as play indicated.  The remaining "not in use" hole locations were plugged with a recycled rubber plug which would not hamper ball roll or maintenance practices.  I thought this was a great idea and if it was good enough for Pinehurst then it would be good enough for us to try.  So today we installed three hole locations in each of our greens, one hole location received the flag and the other two received plugs. 


The USGA has produced a great video about the process and the thought behind the program which you can watch here


Hole locations will be moved periodically depending on the amount of play we receive and any damaged hole will be relocated.  The cups in the putting green have also been removed and replaced with cupless flagsticks which will reduce the wear on the green and improve the appearance of the putting green in the spring.

For those worried about a violation of the Rules of Golf here is an explanation to ease your minds.

For those wondering about what happens should your ball be on the putting green and the rubber plug is on the line of your putt, the Rules of Golf cover this situation. Since this a hole made by a greenkeeper, it meets the Definition of Ground Under Repair. You could choose to play your ball as it lies, but you also have the option to take relief. Rule 25-1b(iii) provides guidance on how to take relief if desired.  
25-1b (iii) On the Putting Green: If the ball lies on the putting green, the player must lift the ball and place it, without penalty, at the nearest point of relief that is not in a hazard or, if complete relief is impossible, at the nearest position to where it lay that affords maximum available relief from the condition, but not nearer the hole and not in a hazard. The nearest point of relief or maximum available relief may be off the putting green.  
 
 
As with many things at The Bear Trace at Harrison Bay we are willing to try many things but I feel strongly that this new technique will not only save us time and manpower but will also protect the greens during the winter months so they will be better prepared to come out of dormancy in the spring healthy and ready for another great season.  If you have any questions, concerns, or comments about this new policy please let me know.

Monday, January 21, 2013

Protecting the Greens with Covers


One of the biggest concerns with growing ultradwarf bermudagrass greens in the transition zone is winter damage.  This damage occurs when the air temperature drops into the lower 20s or below.  One way to protect against winter damage is through the use of greens covers.  Our "rule of thumb" to protect our greens is to cover them when the temperatures are forecasted to be below 25 and not above 35 degrees F for 48 hours.


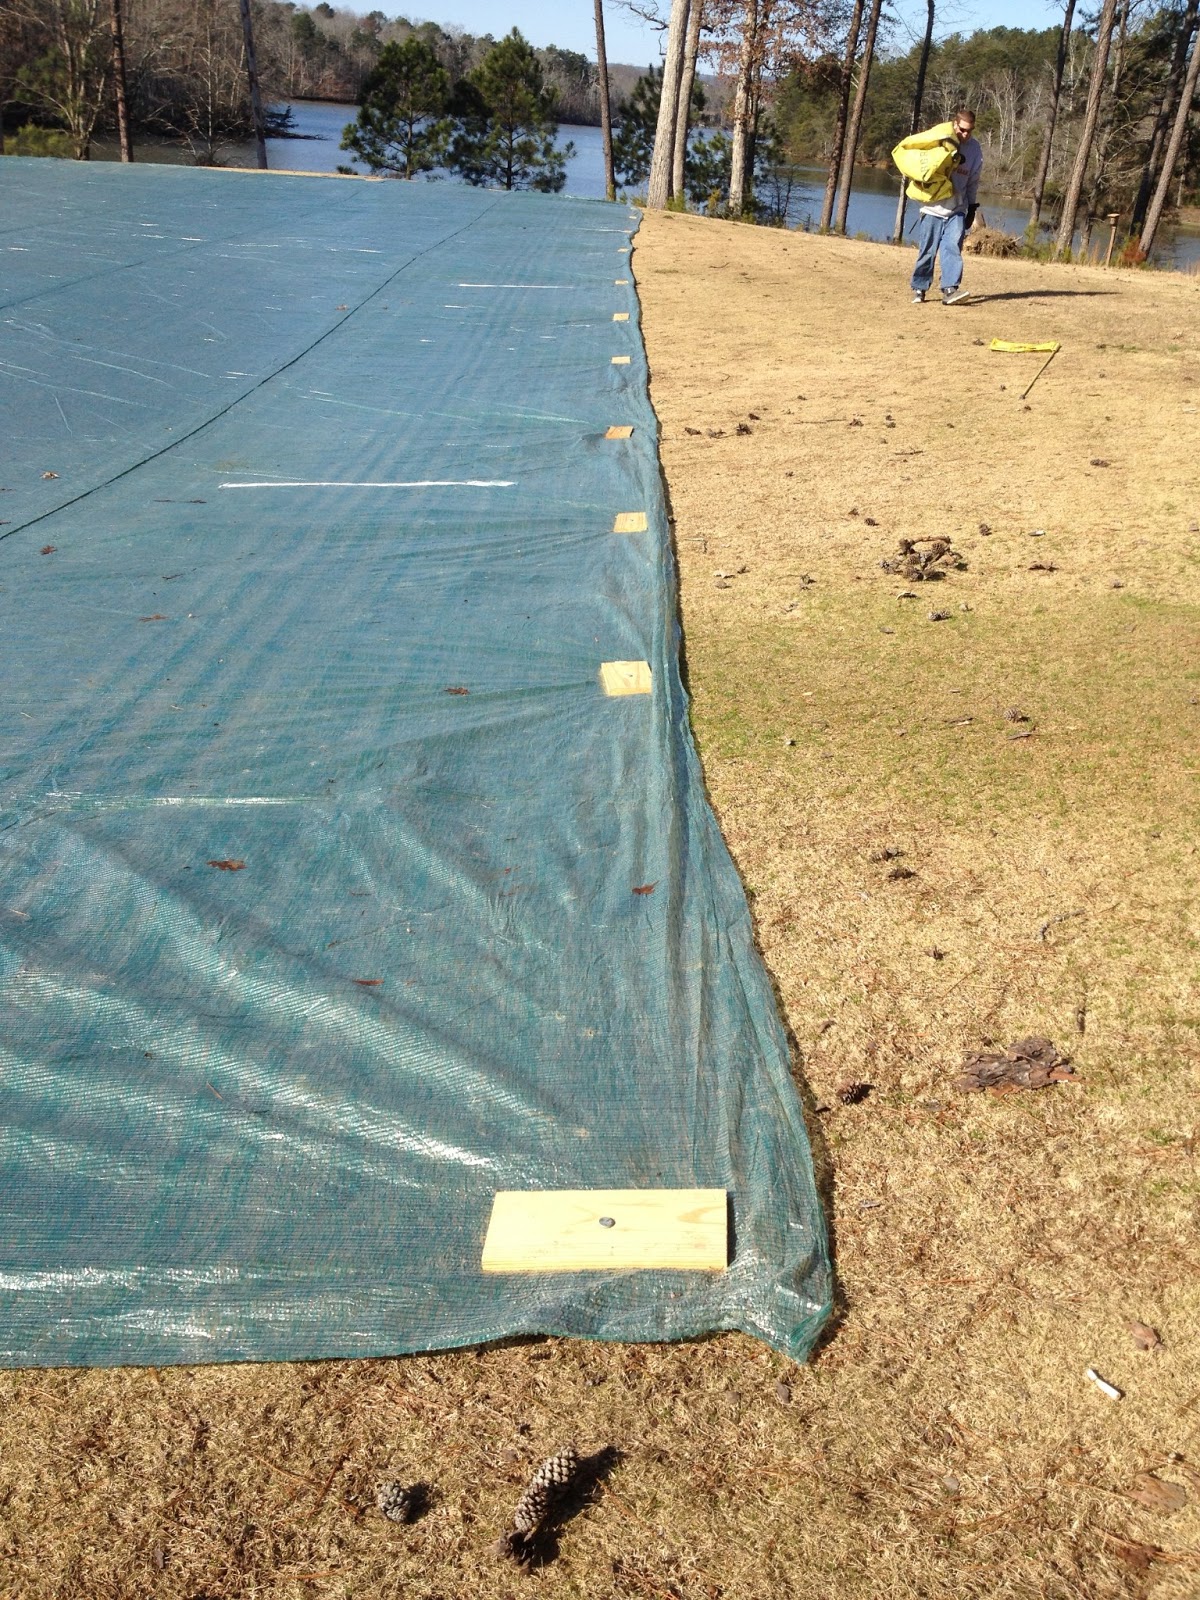
We use Covermaster covers from Evergreen which are light weight woven plastic which will increase the temperature under the covers by 10-12 degrees keeping the greens protected from damage.  With the forecasted temperatures for tomorrow being a low of 20 and a high of 38 we will take no chances in protecting our greens.


 The covers are pulled from one end of the green to the other.  After several years of deploying the covers during the winter months we have the process down pretty good.

 The covers are straightened and pulled tight.

 We have used several methods of securing the covers to the ground over the past years from sod staples to bags of fertilizer the time we waited too late and the ground was already frozen but have found the best method for security and speed of deployment is using 1"x6" boards cut about 12 inches long with a 1/2" hole drilled in the middle.  We use a 10 inch 1/2" spike to secure the cover down.

Ten minutes and we are done covering this green and off to the next.  Deploying all 19 covers will take our crew about three and a half hours. 

The greens will stay covered until Wednesday when the temperatures are supposed to be much warmer.

Monday, December 17, 2012

Time to Paint the Greens


 It's that time of year again to paint the greens for the winter months when our Champion ultradwarf bermudagrass greens go dormant and loose their green color. The paint serves several purposes including providing our golfers a target, absorbing heat to increase the surface temperature of the green compared to an unpainted green and help to give us a jump start to the spring by helping the greens come out of dormancy earlier.
 Above is our 18th hole before it is painted.  To the right Willie Hamby is applying the first or base coat of paint to the green.
 Finishing up the first coat.  We have used many different products over the nine years we have been painting our greens but have had our greatest success with our current mixture of Green Lawnger and AquaStripe Black.
 Applying the second coat of paint to 18 green.  We apply the product in two directions and do two clean up laps which gives us a defined appearance and keeps the paint from going outside of the greens surface.
 #18 green completed.
 
#18 green from the fairway following paint application.